Labels are both more convenient and professional-looking than plain paper for printing postage labels, and the 2844 is a great little thermal workhorse of a printer. Even better, it’s pretty cheap to pick up a used one, partly because UPS gave these away for free for use exclusively with the UPS service.
On the down side, if you do pick up a used one, it’s probably not going to be quite as easy as just plugging it in and hitting print. (In particular, it took me a while to sort out why it was printing a blank label for every label it printed, which was surprisingly tricky to fix.)
First, update the firmware by navigating here and selecting “TLP 2844.” You’ll need the ZDownloader and the latest standard firmware.
Pick up Windows drivers and setup utilities from the same page, under “drivers.” Note: if you have a USB model, you might need to guess what virtual USB port your printer is configured on, which may take a few tries. Mine was on “USB002.”
Go ahead and load 4×6 label stock, then load up the Zebra Setup Utilities, and select Tools->Action>Calibrate Media. This will scroll through a bunch of labels, but you should only have to do this once.
Also in Zebra Setup Utilities, go to configure printer settings, and set the label size to 4×6. The defaults should be fine for everything else.
At this point, you should have a Windows printer called “ZDesigner LP 2844,” which is exactly what you want. You can use it at this point, but it will print out extra labels when used with Stamps.com.
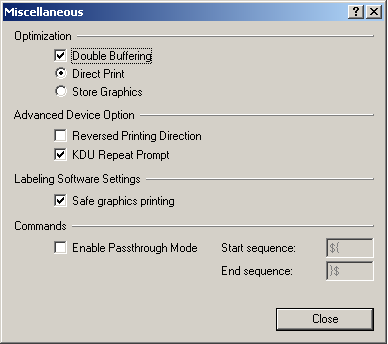
To correct that, right-click on the printer to open properties, then on the General tab, select “Printing Preferences.” On the “Options” tab, make sure that the setting for “Stocks” matches your label size (if not, go back and set up the stock.) Then go to the “Advanced Setup” tab, and make sure that double-buffering is on.
 Once in the Stamps.com software, “printing on” can be set to “Zebra/Eltron Type – Standard 4×6 label – roll” and then selecting “ZDesigner LP 2844” as the destination. Of course, I recommend using “print sample” first, to make sure that everything is dark enough and aligned properly before printing actual postage.

