Stabilizing FreeBSD as a guest under VirtualBox

One of the things virtualization allowed me to do is retire old hardware by imaging the hard drives and booting it up under VirtualBox. This works great, and is often better than trying to extract everything that might be worthwhile later.
Unfortunately, one of the first things I encountered was some instability in the FreeBSD guest. Once the system crashed spectacularly, I found I could no longer make it through compiling a port or updating the ports tree, and in some cases, it crashed on boot a few times before settling down.

By reviewing logs and experimentation, I settled on a configuration that appears to be rock-solid. With the caveat that I did not specifically identify the problem and that it’s possible my hardware and issues differ from others, here it is:

First, after the FreeBSD guest crashes, ufs can be left in a state where it thinks it can restore consistency using the journal, but that’s insufficient. The approach that works is to force a remount, then fsck twice:

mount -fur /
fsck -y /
fsck -y /

Once the errors are settled down, update fsck so that the “sync” flag is added to any mounts in the virtual container:

/dev/gpt/rootfs   /   ufs   rw,sync    1    1

Reboot, which will help stabilize things, because the next thing you’ll need is the emulators/virtualbox-ose-additions-nox package. (If you plan on using X, you can go for same package without the “nox” extension.) You might want to start with “pkg install” rather than building the port, since the port does require kernel source code. If your system isn’t yet stable, it can be challenging to retrieve this and complete the build — each time your system crashes, go back and fsck as above.

Once this package is installed, activate it in rc.conf:

vboxservice_enable="YES"
vboxguest_enable="YES"

Shut down the guest and go back to its settings. Set the Storage->Controller Type to “virtio-scsi” and ensure that the guest boots properly. Once I’ve complete these steps, my FreeBSD guests have experienced no instability.

Share

Restoring the Windows 10 Registry

I tend to back up everything, which not only helps in the event of the occasional catastrophic failure, but is also a godsend in the event of doing something stupid. The first step, of course, is taking backups of everything via BackupPC, so if you’ve landed here and haven’t done that … well, go do that. (If you’re in the unfortunate circumstance of having lost your registry without a backup, well, it’s something to remember for next time.)

What you’ll need: a USB stick with Windows 10 boot media. You can download this right from Microsoft. You’ll also need some way to retrieve your backed up files from your BackupPC installation, but that’s pretty easy.

Locate the hive files from the BackupPC host in question — you’ll find them under \windows\system32\config. You can be surgical about this if you know exactly which hives need restoring, or you can go for the nuclear option:

system
sam
security
software
default

You’ll need them on the USB stick; it’s simplest just to download a .zip file of what you need, then unpack it onto the USB drive. It doesn’t matter where, as long as you can find it later.

Boot from the USB drive (this may require tweaking the boot device in the BIOS) then go to Recover Windows, then go to a command prompt. If you’ve just booted, you probably have an abbreviated C: drive and an X: drive, neither of which is the hard drive you want to copy things to.

diskpart
list volume
(one of these is going to be your Windows drive, it shouldn’t be too hard to pick out)
select volume [number]
assign letter [unused drive letter]
exit

Now copy the registry files from the backups on the USB stick (probably mounted as C:) right over their counterparts on the drive you just mounted. You might want to make backups first, but that’s up to you.

Reboot, and your registry is back

Share

BackupPC and Bare Metal Restore of Windows 7+

It has been five years since I posted BackupPC and Bare Metal Restore of Windows XP, which has been surprisingly popular.  However, Windows XP has been out of official support for quite a while now, and the same techniques, although they can be made to function with newer versions of Windows, are no longer ideal.  On the plus side, there are better options for bare metal recovery now.

First, it’s worth mentioning that BackupPC is a system designed to back up files, not images, so recovery is going to be slightly imperfect.  While the files themselves can be completely recovered, the ability to recover file permissions is limited, so that it may not be suitable for a server with complex file permissions or where security of the data is paramount.  File based backups are particularly good for the case where files are lost or damaged (often through user error) but not well suited to complete system recovery — and catastrophic media failure is often an opportunity to clean out the debris that tends to accumulate over time with computer use.

So, while the ideal vehicle may have been a different backup method, such as an image backup, it’s still quite possible to recover with just the files, as I outline here.  To complete this task, you’ll need a little more than twice as much space as the system to be recovered — it can be in two different places, and that isn’t a bad idea for performance — installation media for the system to be recovered, access to either HyperV or a VirtualBox virtual machine (VirtualBox is free), and the drivers necessary for the system to be recovered to reach the storage.  For example, if it’s on a network share, network drivers may be necessary (even if they’re built in to Windows 7.)

Step 1:  Build a local tar file using BackupPC_tarCreate

This is probably familar as being the exact same step one as before; I note that using gzip to save space or I/O appears to slow things down.  At any rate, this is best accomplished from the command line, as the backuppc user:

BackupPC_tarCreate -t -n -1 -h borkstation -s C / > borkstation.tar

“borkstation” is the name of the host to recover, “-n -1″ means the latest backup, and you’ll obviously need to have enough space where the tar file is going to store the entire backup, which will not be compressed.  Note the space between the “C”, which represents the share to restore, and the “/”, which represents the directory to restore.

Step 2: Prepare base media

The point of this step is to get the drives partitioned the way you want, and as before, it will just be wiped out, so it doesn’t make sense to worry about much except the partition scheme and whether or not it’s bootable, so a base installation will do.  You’ll want it to be able to access the network (or whatever media is being used) as well.

So, in a nutshell, you install an operating system similar to the one you’re recovering. It doesn’t need to be identical, so you can, for example, use a 32-bit version to recover a 64-bit version, or what have you.  You just need a basic, running, system.

Step 3: Back up the system

Yes, the idea is to create a system image of the base system you just installed.  The data will be discarded.  This can be done from Control Panel->System and Security->Backup and Restore->Create a System Image.  This image either needs to be placed somewhere the VM can get to it, or moved there.

Step 4: Mount and erase the drive image

The backup image created in Step 3 is a directory called “WindowsImageBackup” that contains a folder for the PC, along with a lot of metadata and one or more VHD files.  These VHD files are virtual hard drives that can be directly mounted in supported VMs.  You’ll need a VM image that’s capable of understanding the filesystem, but it doesn’t need to match the operating system being recovered.  For VirtualBox, the VHD file can be added to the Storage tree anywhere; it can be left in place, but it will grow to the size of the total of all files to be recovered, so plan accordingly.

For Windows 7, it’s probably easiest to clean it out by right-clicking on the drive (that maps to the VHD) and performing a quick format.  While it’s possible to leave the operating system and other files in place, this usually causes all kinds of permission issues recovering matching files and can result in a corrupted image, so it’s simplest just to clean it out.

Step 5: Extract backup files to the drive image

This step requires that Cygwin be installed on the VM.  A stock install of Cygwin is all that’s really needed, but there’s an important change to make to fstab:

none /cygdrive cygdrive binary,noacl,posix=0,user 0 0

This is necessary because tar’s attempt to restore acl’s to directories doesn’t quite match the way Windows expects things to be done, and without adding “noacl” to fstab as above, tar will create files and directories which it doesn’t have access to, and will experience failures trying to restore subdirectories.

After making the change and completely closing all Cygwin windows, open a Cygwin window, navigate to the destination drive, and run tar on the archive created in step one.  (A shared drive will make it accessible to the VM.)

tar -xvf /cygdrive/z/borkstation.tar

“Z” in this case is the Windows drive which is mapped to the location of the archive; the path simply needs to point to the correct file.  This part takes a while, and since the virtual image needs to expand on its host disk, there will be a lot of I/O.  It helps to have the source archive and the destination VHD on different media.

If permission restrictions aren’t important to you, now’s the time to right-click the destination drive within the VM, and grant full rights to “Authenticated Users.”  This should be sufficient to prevent any lingering permission side-effects.

At this point, the VM should be shut down so the VHD is released.  (It’s a bad idea for more than one owner to access a VHD at the same time.)

Step 6:  Clean up

Aside from the files themselves, there are a number of things stored outside the files that need to be cleaned up.  The “hidden” and “system” attributes, for example, have not been preserved.  For most files, this doesn’t matter much, but Windows has “desktop.ini” files sprinkled all over the filesystem that become visible and useless unless corrected.  This is easy to do from the command line:

cd \
attrib +h +s /s desktop.ini

The mapping of “read only” attributes is unfortunately, somewhat imperfect, and the “read only” bit in Windows may be set for directories for which the backup user did not have full access.  Notably, this can cause the Event service not to function properly, so its directories need to have their read-only bit unset:

attrib -r /s windows/system32/logfiles

attrib -r /s windows/system32/rtbackup

Though it doesn’t seem to cause issues to just unset the read-only bit on the entire system:

attrib -r /s *.*

One ugly thing that’s stored in the NTFS system but not in any files is the short names that are generated to provide an 8.3 file name for files with longer names in Windows.  These are generated on-the-fly as directories or files are added, which means that the short file names generated as files are recovered may not match short file names as they were originally generated.  For the most part, short file names aren’t used, but they may appear in the registry as references for COM objects or DLL’s, and the system won’t function properly if it cannot locate these files.

The simplest way to track these down is to load the registry editor (“regedit,”) select a key, then use File->Load Hive to load the recovered registry from windows\system32\config on the drive image.  Then, searching for “~2” “~3” and so on will yield any potential conflicts between generated short names.  While the registry can simply be updated, it’s usually easier to update the generated short name, which can be done from the command line:

fsutil file setshortname "Long File Name" shortn~1

Note that switching the short names of two files or directories takes three steps, but since short names can be anything at all, this is relatively straightforward.

The last piece to do is file ownership/permissions and ACL’s.  Since none of this is preserved in a file backup, I find it easiest to right click on the recovered image and give full control to “authenticated users,” to prevent problems accessing files.  Your mileage and security concerns may vary.

Step 7:  Recover the image

The simplest way to do this is to boot the system to be recovered to the vanilla operating system installed to produce the image, and use the same Control Panel to select Recovery, then Advanced Recovery Methods, then “Use a system image you created earlier to recover your computer.”

This can also be accomplished from installation media, which is handy if anything goes wrong.  Rather than installing a new operating system, selecting “Repair your computer,” then moving on to Advanced Recovery Methods, should also be able to restore the image.  If you use this method, it may be necessary to manually load network drivers before being able to access shares.

Note:  after the image is restored, the system may complain about not being able to load drivers, and claim that the restore failed.  I’m not sure why this occurs, but it doesn’t seem to matter.  Reboot, and the system should be mostly back-to-normal.

Share

Cloud Overload

Welcome to the Cloud Era, where data is no longer relegated to your personal PC, but to the ubiquitous and ambiguous “cloud.”  This has a number of advantages, but unfortunately, cloud as a technical term has now been soundly abused (as much as “database”) — used to mean everything from a hosted service (formerly known as a “website”) to a redundant cluster of computers meant to provide resilience in the case of localized failure.

Here I present a brief review of a handful of “cloud services,” by which I’m mostly referring to what I’ll call “cloud drives” — in other words, a service which provides synchronization and storage services for files you put in it.

dropbox

I’ll start with Dropbox, which is arguably the category leader, and a handy reference point by which to judge other entrants.  Dropbox provides 2 GB of space free to do with essentially anything you want, has clients for all popular platforms, including Windows, OSX, and Linux, as well as mobile platforms like the iPhone, Android and (of all things) the Blackberry.  As with other providers, paid plans increase the storage available and enable use for business.

Aside from the obvious things that one can do with shared storage, Dropbox has a number of features:  First, files can be shared publicly, enabling a handy way of sharing a file with somebody using a URL.  Second, on mobile platforms, Dropbox will automatically upload pictures taken — and on desktop platforms, screen shots.  This is quite handy when combined with the previous ability to publicly share files.

onedriveOneDrive is the offering from Microsoft formerly known as SkyDrive and attached to their Live service — and Passport, or what-have-you.  OneDrive starts with a lot more storage — 15 GB, and has smaller-increment paid plans than Dropbox.  (Smaller leaps in storage for less money.)  OneDrive doesn’t support *nix or the Blackberry.  OneDrive has the same photo upload and public sharing features as Dropbox.

What OneDrive adds is automatic organization of documents and combination with other Microsoft services, like Office 365, and is built in to newer Windows operating systems.  Great if you use a lot of Office or are stuck with a Windows phone, I guess.

googledriveGoogle Drive matches OneDrive’s 15GB storage space, and synchronizes with Google Docs in a fashion somewhat similar to OneDrive — except that Google Docs is free, and documents can be freely edited and collaborated with no other subscriptions or software.  Integration with Gmail means that attachments can be added to your drive easily, though it also means that Gmail and Google Drive share the 15GB limit.

Google Drive lacks picture upload capabilities, but can share files publicly.

icloudiCloud Drive is Apple’s offering in Cloud drives, with general file synchronization and storage being a recent development.   Its features beyond that are both venerable and (understandably) very Apple-specific, so some of its features, like contact synchronization, are really only useful if you’re already using Apple devices to store your contacts in the first place.  Others, like Notes, require a new iCloud email address.  It’s available on Windows, IOS8, and (soon) OSX.  iCloud Drive comes with 5GB of storage, which is shared with backups of your IOS devices.

While it does have photo features, iCloud lacks the ability to share files publicly.

amazon-cloud-driveAstute readers have spotted a trend by now — every place that has their own infrastructure seems to have a cloud drive offering — and yes, Amazon has their own cloud drive offering called Amazon Cloud Drive.  If you have a Kindle, you’re no doubt using it already, and you’ll find any personal documents here.  It also integrates with Amazon’s cloud player.  5GB is included, which is shared with personal Kindle documents (but not purchased eBooks.)

Amazon’s Cloud Drive has client apps for phones (that can handle phones) but lacks an app for desktop synchronization.  Files uploaded to the Amazon Cloud Drive may be shared publicly.

owncloudOwncloud is a bit different for a number of reasons, but the biggest one is probably that it’s open source software that you run on your own platform.  While this may not be too useful if you don’t have a platform, the easy availability of inexpensive VPSes makes this a relatively inexpensive proposition to set up, and it has some features that other offerings lack.  However, it also lacks one critical thing that other cloud drives promise:  built in redundancy — so you either need to set up your own, or use it in a way that resilience isn’t critical.  Intriguingly, owncloud can use Google Drive for storage, which means its features can be combined with Google Drive’s resilience.

Like other cloud drives, Owncloud has synchronization clients for major platforms.  Photos can be uploaded from phones, but not automatically.  Owncloud stands out because of the control it provides, its essentially unlimited storage (limited by your platform, of course.)  Shared files are automatically versioned, can be password protected, and when deleted, linger for set periods of time.  Owncloud can also include document editing capabilities (if installed) and has “apps” which can be loaded on the server to handle contacts, calendars, etc.  Contacts, for example, provides a decent web interface, as well as synchronization via carddav.

Share

PC Repair and Sunk Cost Fallacies

We have a Gateway Profile 5.5 that we bought used at a Hamfest.  While not the latest or greatest, it was at least a solid workhorse of a machine, until it suddenly switched itself off.  When it came back on, the screen presented only this:

This system's cooling fan is not operating properly. Please check fan operation. 
Your system has been halted.

It probably wasn’t worth a lot of money to fix, so I made the natural assumption that one of the fans had either failed or was clogged with dust.  I thoroughly cleaned the interior, checked the fan bearings, cleaned the heatsinks and replaced the heat sink compound.  It worked for about a day before I got the same message, from which it absolutely refused to recover.

One of the fans was a relatively expensive squirrel cage fan, but fine, if it took new fans to make all this worthwhile, then I’d buy brand new fans.  The PC booted all the way, but wouldn’t run a full burn in test without shutting itself down.

The other possibility was that the sensors on the motherboard were defective.  Motherboards for the system were available, but at a premium relative to their capabilities due to their proprietary nature.  Fine.

As of this moment, to fix this problem, I have gone through:

  • 4 motherboards (2 refused to boot, 2 with the same fan message)
  • 2 sets of fans
  • 2 power supplies
  • An I/O board
  • A hard drive
  • A CPU
  • Two sets of RAM

In a very literal way, there is nothing left of the original PC except the LCD screen and a plastic shell, leading me with several possibilities:

  • This is a common problem due to a failure of a component on the motherboard
  • Through some relationship bordering on magical, the problem is caused by the LCD (or even more unlikely, by the case itself, somehow.)
  • I am exceedingly unlucky, and have experienced the same type of failure on multiple components within the same short period of time (or I manage to keep buying defective parts.)

The worst part is, even though I’m well aware of the sunk cost fallacy and that any further attempt to repair this PC is likely to result in nothing more than a time consuming way to dispose of money, the pile of parts which should be a functional PC instill an overwhelming desire in me to fix this PC, and once and for all find out what’s really wrong with it.

Probably ghosts.

Share

PS3 Media Server and the Xbox 360

PS3 Media Server is a DLNA server capable of, among other things, streaming and transcoding local media files to Digital Media Players.  While this includes the PS3, it also includes the Xbox 360, which makes a pretty decent media player, and the server handles things like subtitles rather neatly.

Transcoding means the server can handle converting, for example, mkv video files on-the-fly, obviating any need to convert them before viewing.  However, my initial experiments with mkv files showed the following error in the debug log:

[wmav2 @ 0x33e4946240] output buffer size is too small

However, looking at the command issued to mencoder by PS3 Media Server, there were no knobs to increase the buffer size beyond what was already specified…  And only the Xbox 360 had this issue, as other devices did not require wmav2/asf.

Counterintuitively, the solution was to upgrade ffmpeg to 1.0.1.  While ffmpeg transcoding worked perfectly well, its libavformat and libavcodec libraries are used by mencoder to transcode to wmav2, and something between mplayer/mencoder and the older version of ffmpeg led to the error.

On a Gentoo box, this stack works well:

PS3 Media Server 1.72
MPlayer 1.1
ffmpeg 1.0.1
Share

Fun with Extortionware, or Curse you, Java!

Safety on the internet — that is, protecting your computer from malware — used to be as simple as not downloading and running dodgy executable code.  Sure, some people were tricked, either via emails from “friends” or popups trying really hard to convince them to run a local binary.

Websites that wanted to provide a richer experience had a few options:  run ActiveX controls in IE — the notion of letting a binary run because a website told it to seemed stupid even at the time, even with the idea of “signed” ActiveX controls, so you’d know who provided a control.  There was Flash, a proprietary binary and scripting language now owned by Adobe, and then there was Java, which ran in its own virtual machine with limited access, which seemed like the saner of all the options.

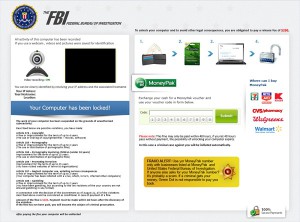
Ransomware Screen

This ransomware screen appeared over pretty much everything

Recently, I stayed in a hotel where the first thing I did was poke through some of my history, looking for an article I’d been reading before — which I located, and about a paragraph in, my screen was entirely replaced with a (fake) FBI warning and a demand to pay a “release fee” of $200 to regain control of my computer.  This was accompanied by the hotel’s IP address, and a display window that was apparently supposed to turn on the PC’s camera and show me in my underwear.

This is known as the “FBI Green Dot Moneypak” scam, or the “FBI Moneypak Virus,” which actually covers a large family of extortionware — which is essentially a monetizing payload, like this scam, plus a way to deliver it to your computer.  In my case, the delivery mechanism appears to be a Java exploit, triggered by either a malicious ad from a site I’d visited before (at home we use a proxy that strips out suspicious ads, so it’s possible it had been there before, but my PC wasn’t actually infected until I visited the same site from the hotel.)

In my case, the infection was completely missed by malware scanners, which seemed to think that my PC was perfectly fine, and even ad hoc scanners proved relatively useless — even a few which claimed to be able to detect and remove this (detection is free, removal requires payment) were blissfully unaware that the infection had taken place.  Googling wasn’t a lot of help either, since I was either directed to sites with generic instructions to run whatever scanner they were hocking (none of which worked) or long lists of registry keys to check, none of which appeared to exist on my system.  So it was either hiding itself well, or too recent to be picked up by scan-based systems.

At any rate, since it was Windows 7, I was able to “switch user” to an Administrator account, and I since I hadn’t received a request to escalate permissions, chances were relatively good it hadn’t inserted itself too deeply into my OS.  I found two suspicious binaries — suspicious, because they weren’t where binaries typically go:  in c:\ProgramData was “lsass.exe” and in c:\Users\username\AppData\Local\Temp was “ctfmon.exe.”  Both of these are legitimate Windows binaries that would be run — lsass.exe, for example, is the Local Security Authority Subsystem Service, a legitimate version pretty much needs to be running or the system will restart, and ctfmon.exe activates the language bar.  Since I generally have that turned off, this is pretty suspicious, but even more suspicious is the location of these files.  Deleting them in safe mode (from an alternative account) cleared the infection, returning control of my PC.  The PC complained about not being able to find a few files it wanted to run on startup, but I considered that a good sign.

Meanwhile, I went back to my browser to examine the source of the infection, and surely enough, a Java plugin was enabled — and since it’s the only thing enabled, it’s pretty obvious that this was the source of the problem.

If you haven’t done so already, I’d recommend disabling your Java plugins (virtually no Internet site uses it any more) and any other plugins which you don’t actually need.  If you do use Flash, which is relatively hard to avoid, at least make sure it’s up to date.  Note that updating the version of Flash doesn’t necessarily update the plugin version, so check from within your browser, not just by looking at versions in the Control Panel.

Mozilla has a handy URL that actually works across browsers:

https://www.mozilla.org/en-US/plugincheck/


Share

FreeBSD bsdpan- to p5- migration for perl modules

FreeBSD has a package system to manage installations and dependencies, and so does perl.  Perl on FreeBSD, therefore, causes these to intersect in interesting, and sometimes suboptimal ways.

CPAN can be used to install perl packages that aren’t in the ports tree, and FreeBSD handles this with relative grace by including them in its package database with the prefix “bsdpan,” and be excluded from updates.  An identical package installed from the ports tree will be prefixed with “p5” instead, and be treated as any other port, with dependencies and upgrades handled as part of the ports system.

After trying out a few CPAN modules (which in turn installed their own dependencies) I found myself with a great many “bsdpan” packages, which I’d prefer to tuck neatly into the bsd ports tree rather than continue to manage with CPAN, therefore, I whanged together a shell script to do it:

#!/bin/sh
pkg_info | grep ^bsdpan | awk '{print $1}' > /tmp/bsdpan-to-p5.tmp
> /tmp/bsdpan-to-p5-2.tmp
cd /usr/ports
while read bsdname; do
  name=$(echo $bsdname | cut -c 8- )
  portpath=$(make search name=p5-$name | grep ^Path | awk '{print $2}' | sed -r 's/\/usr\/ports\///')
  shortname=$(echo $name | sed -r 's/(.*)-.*/\1/');
  if [ "$portpath" ]; then
     echo -n p5-$name is in ports,
       echo " adding to list"
       echo portupgrade -o $portpath -f bsdpan-$shortname >> /tmp/bsdpan-to-p5-2.tmp
  else
     echo p5-$name not in ports
     portpath=$(make search name=p5-$shortname- | grep ^Path | awk '{print $2}' | sed -r 's/\/usr\/ports\///')
     if [ "$portpath" ]; then
       paths=$(echo $portpath | wc -w)
       if [ "$paths" -eq "1" ]; then
          p5name=$(make search name=p5-$shortname- | grep Port | awk '{print $2}')
          echo " ... $p5name found, using that"
          echo portupgrade -o $portpath -f bsdpan-$shortname >> /tmp/bsdpan-to-p5-2.tmp
       fi
     fi
  fi
done < /tmp/bsdpan-to-p5.tmp
rm /tmp/bsdpan-to-p5.tmp
echo
echo "Starting conversion ..."
echo
sh /tmp/bsdpan-to-p5-2.tmp
rm /tmp/bsdpan-to-p5-2.tmp

The script tries to automate a manual process of finding the corresponding “p5” port for each “bsdpan” port, and builds a script that replaces each one using the portupgrade tool.

It doesn’t make any attempt to resolve dependencies, so it may take a few passes.  It also can’t help where a search for the port name returns more than one possibility (usually part of a longer name) or when the “p5” name happens to be nothing like the “bsdpan” name, but in practice, there are only a handful of exceptions.

Share

3D Printing — A Comedy of Errors

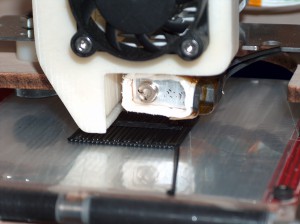
Printing a Proper Raft on a Makerbot Thing-O-Matic

Printing a Proper Raft on a Makerbot Thing-O-Matic

I recently acquired a Makerbot Thing-O-Matic, a printer I selected due to its apparent ubiquity and to its price — under $1000 if you do the assembly yourself.  With the heady optimism and overconfidence borne of having not yet attempted something, I dove in with my boxes of parts and wiki instructions.  Besides, I build stuff all the time, which is the point of having a 3D printer in the first place.

Another appeal of a largely community-supported machine is the lack of need to talk to tech support, which is usually a dismal experience.  I contacted a tech support for a popular anti-virus program which would occasionally inexplicably shut down when I was using it on public networks.  Tech support’s answer: don’t use public networks.

At any rate, aside from backtracking a few times (the combination of extra parts and following some outdated instructions led to a few false starts, and a quirk or two of design, assembling the little beast wasn’t a problem.  I didn’t start causing my own problems until I actually started printing.

I calibrated and made little adjustments in order to improve my print quality:

  • The stepper extruder didn’t have enough clearance to grip the filament, so I removed a washer
  • The extruder had trouble pushing the plastic through, so I increased the temperature
  • The raft was blobby, so I lowered the nozzle relative to the build platform
  • The raft didn’t stick to the build platform, so I raised the temperature of the build platform

After all this tweaking and adjusting, I was able to print some pretty good looking calibration cubes, that more or less looked like the pictures I was seeing on the web.  However, absolutely all of these adjustments were exactly the wrong thing to do.  I had managed to put together a set of tweaks that made fairly good, accurate prints, that warped crazily as soon as they were finished.

  • The stepper extruder doesn’t have much clearance for the filament because it grips the filament very tightly.  The filament should have bite marks from the extruder.  Putting the washer back in, I cut the filament in a “v” shape before feeding it in so that it could be gripped.
  • Turns out I could actually lower the temperature of the extruder, now not having any trouble pushing filament through the nozzle.
  • Having the nozzle so close to the build platform was pressing the raft right into whatever I was printing.  Raising the nozzle opened up the raft and allowed it to actually come off.
  • With the nozzle farther away from the build platform, it no longer tended to drag the plastic away from the platform, and the platform temperature could be lowered as well.

Weirdly, even with things boldly out of whack, I was able to produce some very good prints, although they took a lot of clean-up and sanding, and warping was a real issue.  The look of things hasn’t changed much, but less clean-up is necessary and less warping means more things will actually come out shaped closer to how they were designed.

Share

Zebra/Eltron/UPS 2844 label printing with Stamps.com

Labels are both more convenient and professional-looking than plain paper for printing postage labels, and the 2844 is a great little thermal workhorse of a printer.  Even better, it’s pretty cheap to pick up a used one, partly because UPS gave these away for free for use exclusively with the UPS service.

On the down side, if you do pick up a used one, it’s probably not going to be quite as easy as just plugging it in and hitting print.  (In particular, it took me a while to sort out why it was printing a blank label for every label it printed, which was surprisingly tricky to fix.)

First, update the firmware by navigating here and selecting “TLP 2844.”  You’ll need the ZDownloader and the latest standard firmware.

Pick up Windows drivers and setup utilities from the same page, under “drivers.”  Note:  if you have a USB model, you might need to guess what virtual USB port your printer is configured on, which may take a few tries.  Mine was on “USB002.”

Go ahead and load 4×6 label stock, then load up the Zebra Setup Utilities, and select Tools->Action>Calibrate Media.  This will scroll through a bunch of labels, but you should only have to do this once.

Also in Zebra Setup Utilities, go to configure printer settings, and set the label size to 4×6.  The defaults should be fine for everything else.

At this point, you should have a Windows printer called “ZDesigner LP 2844,” which is exactly what you want.  You can use it at this point, but it will print out extra labels when used with Stamps.com.

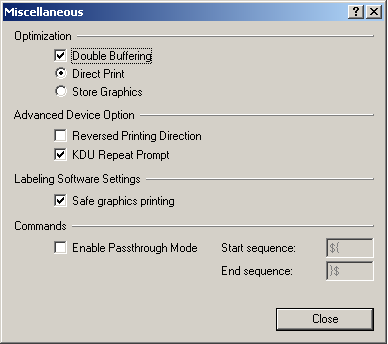
To correct that, right-click on the printer to open properties, then on the General tab, select “Printing Preferences.”  On the “Options” tab, make sure that the setting for “Stocks” matches your label size (if not, go back and set up the stock.)  Then go to the “Advanced Setup” tab, and make sure that double-buffering is on.

LP2844 Miscellaneous Advanced SettingsOnce in the Stamps.com software, “printing on” can be set to “Zebra/Eltron Type – Standard 4×6 label – roll” and then selecting “ZDesigner LP 2844” as the destination.  Of course, I recommend using “print sample” first, to make sure that everything is dark enough and aligned properly before printing actual postage.


Share