Green backups with BackupPC and WOL

In an effort to reduce power consumption, I’ve moved most systems I use regularly onto a pair of virtual servers, enabling me to keep many machines off most of the time, except for occasional use.  There are still a few physical machines, and I do prefer to have current backups of everything, so I decided to use the wake-on-LAN protocol, which seems to work for most modern computers hard-wired to ethernet (on the same segment.)

I started with this post by Salik Rafiq, but my first problem was that I didn’t want to turn every machine on, back it up, and then just leave it on.  Nor did I particularly want to turn every machine off after being backed up, since it’s not unusual for a machine to be backed up while I’m actually using it for something.  The obvious solution is to store whether or not a machine is actually on, then return it to that state afterward.

I made a few other changes, which I’ll briefly outline:

  • My BackupPC sends 5 arguments to ping, so I lazily hacked in arguments 3 and 4.  (There are much more elegant ways to do this.) so this script assumes that the last argument is the machine name.
  • I replaced “ethwake” with “wakeonlan,” for the sake of simplicity (not that etherwake doesn’t work, but since WOL packets require a hardware address anyway, why not just use the hardware address?)
  • Related to the above, I retrieve and store the hardware addresses for each machine using the simple command “arp -a machine > machine.wol” which gives me a file with the hardware address for each machine.
  • Note that I use the hardcoded directory “/usr/tools/wol” for both hardware and state information.  The $WOLDIR directory is used for hardware and state information.

As with Salik’s original script, this replaces the “ping” command for BackupPC, and is reasonable to use with every machine, whether or not it supports wake-on-lan.

#!/bin/bash

#this script is totally designed for the backuppc ping command
#which is the first thing it does before it starts a backup
#this is a substitute which pings the machine, if it is not
#awake then it wakes it using a magic packet - using the wol.bsh script
#then pings again to make sure

PING=/bin/ping
argnum=$(($#-1))
ARGS=${@:1:$argnum}
WAKEHOST="${!#}"
ETHWAKE=/usr/bin/wakeonlan
WOLDIR=/usr/tools/wol
SLEEPTIME=3m

logger "Backuppc pinging $ARGS $WAKEHOST"

function getwol {
	if [ -f $WOLDIR/$1.wol ]; then
	   hwaddr=$(cat $WOLDIR/$1.wol | cut -d" " -f4)
	else
	   logger "No MAC address for $1"
	   exit -1
	fi
}

function fwol {
        TO_WAKEUP=$1
	getwol $1
        sudo $ETHWAKE $hwaddr
}

$PING $ARGS $WAKEHOST >>/dev/null 2>&1

if [ $? -ne 0 ]; then
        fwol $WAKEHOST
        if [ "$WOL_RES" = "FAIL" ]; then
                exit 1
        fi
	echo "OFF" > $WOLDIR/$WAKEHOST.state
        sleep $SLEEPTIME
        $PING $ARGS $WAKEHOST
        if [ $? -eq 0 ]
        then
           logger "success waking $WAKEHOST."
        else
           logger "unable to wake $WAKEHOST."
           exit 1
        fi
else
   $PING $ARGS $WAKEHOST
   echo "ON" > $WOLDIR/$WAKEHOST.state
fi

exit 0

To turn the machines back on, I updated my postcmd.sh script (see this post for details) to look up the machine state, and if it was off before, turn it off now:

#!/bin/bash
WINEXE=/usr/bin/winexe
UNAME="Username"
PWD="Password"
WRKGRP="WORKGROUP"
BOX=$1
PID=$($WINEXE -U $UNAME -W $WRKGRP --password=$PWD //$BOX 'cmd /c echo '1'
> c:\backuppc\wake.up')
echo "Rsync and shadow copy unloaded"
if [ -f /usr/tools/wol/$BOX.state ]; then
   read wasoff < /usr/tools/wol/$BOX.state
   if [ "$wasoff" = "OFF" ]; then
      $WINEXE -U $UNAME --password=$PWD //$BOX 'shutdown -f -s -c "Backup
Complete"'
   fi
fi

Although it only recognizes “on” and “off” as valid machine states (it doesn’t detect nor return a system to hibernated, sleeping, etc. states) it at least takes care of the simple function of turning machines on, backing them up, then turning them back off.

For systems that don’t support wake-on-lan, like those connected through wireless, I’m considering using X10.

Share

Interlude with Apple Developer Support

As a consumer, getting support for Apple’s devices is pretty easy.  If it’s in warranty or you have AppleCare, it’s not hard to get something fixed.  As a developer, however, working with Apple is … not so easy.

Apple has one of my widgets available for download, which periodically gets updated.  The usual procedure is to log in to Apple, update a few fields, point to the new URL, and everything’s fine in a day or two.

Lately, though, the form has been failing with the error, “Please fill in all required fields.”  There’s no indication of which fields or what to do, so after weeks of trying different combinations of things, I contacted Apple Developer Support.

Dear Apple Developer Support:

I maintain an OSX widget available at [URL.] I am trying to update it using the form at https://developer.apple.com/submission/mac/form_edit.php

However, the form *always* returns the same error: “Please fill in all required fields.”

There is no indication of what fields are not filled out, and I have meticulously filled out every single field. I have attempted to do so from every major browser, including Safari, Firefox, IE, and Chrome, from every OS including OSX and Windows, and from several countries including the US, Canada, and India.

I cannot get this form to work. Is there anything that can be done? Can you tell me what this form wants?

Almost immediately, I got a form letter that they are working diligently on whatever my issue may be, and then a few days after that:

Please include the line below in follow-up emails for this request.
Follow-up: 136749696

Re: Software Downloads feedback

Hello,

Thank you for contacting Apple Developer Support regarding Software Downloads.

Feedback regarding Software Downloads may be submitted to Apple via the Mac OS X web
site:


Please know that the email address you have written to is
used to provide program-level support to members of the Apple Developer Program. We are unable to provide general product support via this Apple channel.

Thank you for understanding our support policies. We appreciate the time that you have taken to send your comments to Apple.

Best regards,

Yutaka Ikeda
Apple Developer Support

So, I’m essentially told that they don’t help with downloads, only developer issues, and I’m directed back to the contact page where I found the address I sent my original email to.
Dear Apple Developer Support:

I am not trying to download anything. I am trying to use the developer site, which is not working.


Omitted: Several back and forth emails where I beg somebody to read my request, and not just send me a random form letter directing me to the contact page.  Also omitted:  I repeat the problem each time.

Please include the line below in follow-up emails for this request.

Follow-up: 136749696

Re: iOS Developer Program

Hello,

Please know in order to consider your request, we need you to furnish the following
information:

– Step by step information to reproduce the issue
– Screenshots reflecting the error messages
– System hardware and operating system configuration
– Browser and version
– Indicate type of connection (i.e., cable, DSL, corporate network, etc.)
– Indicate if you are behind a firewall
– Provide text for any error messages that you have received
– Indicate if you are behind a proxy server

Thank you for your assistance.

Best regards,

Jeremy Nickel
Apple Developer Support

Wait, what? Well, fine, at least I’ve been routed to the correct department.

Dear Apple Developer Support:

Are these delaying tactics? Because seriously, the initial instructions I
included aren’t hard to follow.

Go here:
https://developer.apple.com/submission/mac/form_edit.php

Update the version. Or anything. Use any browser. It doesn’t matter.
Naturally, I’m logged in as me.

Watch it tell you you’re missing a required field.

I usually stop here, but for the full experience, you can spend weeks
trying to get somebody to take a look and provide anything other than a
moronic form response or a nonsensical request for more information.

A few days later, I got this response:

Please include the line below in follow-up emails for this request.

Follow-up: 136749696

Re: iOS Developer Program

Hello,

Please know in order to consider your request, we need you to furnish the following
information:

– Step by step information to reproduce the issue
– Screenshots reflecting the error messages
– System hardware and operating system configuration
– Browser and version
– Indicate type of connection (i.e., cable, DSL, corporate network, etc.)
– Indicate if you are behind a firewall
– Provide text for any error messages that you have received
– Indicate if you are behind a proxy server

Thank you for your assistance.

Best regards,

Jeremy Nickel
Apple Developer Support

Yes. It’s the exact same form letter. Frankly, at this point, I hate Jeremy Nickel, and I want him to burn in hell. Is it really so difficult to understand that a web page is broken? Seriously, Jeremy, if you can’t be bothered to actually read any of the email you get, are you really in the right position?

Dear Apple Developer Support:

Please do not send me this useless form letter again, I’ve answered every
goddamned question more than once. If you have an actual question, feel
free to ask. If you want to send me a form letter, please just tell me
directly “I’m really too stupid to handle this,” it’s more honest and
direct.

> Please include the line below in follow-up emails for this request.
>
> Follow-up: 136749696
>
> Re: iOS Developer Program
>
> Hello,
>
> Please know in order to consider your request, we need you to furnish the
> following information:
>
> – Step by step information to reproduce the issue

Provided. Three times.

> – Screenshots reflecting the error messages

Imagine the screen, with a red “Please fill out all required fields” on
it. If you seriously need a screen shot of that, let me know.

> – System hardware and operating system configuration

I’ve tried several dozen. It does not fucking matter.

> – Browser and version

I’ve tried several dozen. Safari, Firefox, IE, whatever.

> – Indicate type of connection (i.e., cable, DSL, corporate network,
> etc.)

Again, tried on dozens.

> – Indicate if you are behind a firewallÂ

No.

> – Provide text for any error messages that you have receivedÂ

Once again, “Please fill out all required fields.”

> – Indicate if you are behind a proxy server

No. And yes. What the fuck? Who fucking cares? I’m just going to get the same fucking form letter from you anyway.

Tell you what, Jeremy, just fucking GO to the URL, and if it miraculously works for you, send me your operating system, your browser version, and whatever the fuck you filled in to make it work.

Share

L4D2 OS Paged Pool Memory Low on XP

From Steam, I installed and played Left for Dead 2 (L4D2) for a few hours without any problems.  After rebooting after an update, the warning “OS Paged Pool Memory Low” in red appeared in the game, followed shortly by bizarre visuals, halting sound, jerky game play, and ultimately, a lockup or crash.  A few days later (and after rebooting) I tried it again, and it was fine.  Until I rebooted …

It seemed that pawing at it like a confused monkey was not solving my problem, so I consulted the Internet, which recommended a curious mixture of unrelated voodoo and homeopathic remedies, and Steam themselves has a page that mumbles incoherently about drivers and suggests removing parameters that nobody has.  Those few people who have had, and solved this problem, appear to have tried hundreds of things all at once and were clueless as to what fixed the issue.

While making sure drivers are up-to-date is rarely bad advice, it’s unlikely to actually fix anything unless your current drivers happen to be buggy.

So, what’s happening, and how does one fix it?

XP has two memory pools, paged and non-paged, and without going into too much technical detail, paged memory can use disk space to expand its total pool (“virtual memory.”)  XP uses heuristics at boot time to determine how much memory to dedicate to the non-paged and paged pools.

Specifically, XP calculates a limit for the paged pool based on how much address space that other resources, like page table entries, want.  With a lot of RAM and a reasonable amount of swap, XP can still apparently get it wrong.  On the plus side, it can be tweaked manually to solve the issue.

HKEY_LOCAL_MACHINE\SYSTEM\CurrentControlSet\Control\Session Manager\Memory Management

in the registry has all kinds of nifty knobs, and the most important one is “PagedPoolSize.”

Note:  before doing this, make sure you have a reasonable amount of physical ram and that virtual memory (My Computer->Properties->Advanced->Performance->Virtual Memory) is set either to automatic, or at least a gig or two or twice physical ram size.

PagedPoolSize is almost undoubtedly set to “0,” which means XP will automatically determine the limits.  Setting this to “0xFFFFFFFF” means “set this as high as possible,” which is a dynamic value, but based on your amount of physical RAM rather than every other knob in the system.  As a troubleshooting step, it’s reasonable to start here — reboot, then try out L4D2.

If it works, you can back this number down a bit:  some testing has shown that 256M is sufficient to play without problems (“0x10000000” hex, or “268435456” decimal) but your mileage may vary.

Share

Voice Announcements via Modem

We have a PBX system through which it’s possible to make announcements, some of which I find myself making regularly.  Having an old voice modem lying about, I decided to program it to make regular announcements for me.

Rather than dedicate a modem to voice announcements, I decided to share a modem that’s also used for HylaFAX, on the principle that the less hardware to have to worry about, the better.  HylaFAX shares a locking system with minicom, meaning that if I use minicom for the voice announcements, I don’t have to worry about who has control of the modem, or of relinquishing control to HylaFAX.

I located an ancient voice command  manual for my US Robotics voice modem online.  While it took some trial-and-error, I eventually whanged together this script:

#/bin/bash
if [ "$1" = "--help" ] || [ "$1" = "" ] || [ "$2" = "" ]; then
echo 1>&2 Usage: $0 [# to dial] [voicefile.rmd]
echo --help      this message
exit 1
fi
PID=$$
cd /tmp
echo print "starting" > /tmp/minicom.$PID
echo send "ATZ" >> /tmp/minicom.$PID
echo expect { >> /tmp/minicom.$PID
echo \"OK\" >> /tmp/minicom.$PID
echo } >> /tmp/minicom.$PID
echo send "AT#CLS=8" >> /tmp/minicom.$PID
echo expect { >> /tmp/minicom.$PID
echo \"OK\" >> /tmp/minicom.$PID
echo } >> /tmp/minicom.$PID
echo send "AT#VRN=0" >> /tmp/minicom.$PID
echo expect { >> /tmp/minicom.$PID
echo \"OK\" >> /tmp/minicom.$PID
echo } >> /tmp/minicom.$PID
echo send "AT#VRA=0" >> /tmp/minicom.$PID
echo expect { >> /tmp/minicom.$PID
echo \"OK\" >> /tmp/minicom.$PID
echo } >> /tmp/minicom.$PID
echo send "AT#VSM=129,8000" >> /tmp/minicom.$PID
echo expect { >> /tmp/minicom.$PID
echo \"OK\" >> /tmp/minicom.$PID
echo } >> /tmp/minicom.$PID
echo send "ATS46=255" >> /tmp/minicom.$PID
echo expect { >> /tmp/minicom.$PID
echo \"OK\" >> /tmp/minicom.$PID
echo } >> /tmp/minicom.$PID
echo send "AT#VRA=0" >> /tmp/minicom.$PID
echo expect { >> /tmp/minicom.$PID
echo \"OK\" >> /tmp/minicom.$PID
echo } >> /tmp/minicom.$PID
echo send "ATDT,$1" >> /tmp/minicom.$PID
echo expect { >> /tmp/minicom.$PID
echo \"VCON\" >> /tmp/minicom.$PID
echo } >> /tmp/minicom.$PID
echo "sleep 1" >> /tmp/minicom.$PID
# here's the voice part
echo send "AT#VTX" >> /tmp/minicom.$PID
echo expect { >> /tmp/minicom.$PID
echo \"CONNECT\" >> /tmp/minicom.$PID
echo } >> /tmp/minicom.$PID
echo "sleep 1" >> /tmp/minicom.$PID
echo "! cp $2 /dev/ttyUSB0" >> /tmp/minicom.$PID
# end
echo >> /tmp/minicom.$PID
echo sleep 2 >> /tmp/minicom.$PID
echo ! killall minicom >> /tmp/minicom.$PID
/usr/bin/minicom -S /tmp/minicom.$PID
cat /tmp/minicom.$PID
rm /tmp/minicom.$PID

It’s fairly linear — it puts the modem into voice mode, sets a number of parameters, and escapes to the shell to copy a file to the device.  What remained is to create a file in a format that the modem could consume.

Luckily, Ubuntu has a package called mgetty-pvftools which contains all the binary files necessary to make it happen.  (These files are bundled with vgetty on Gentoo, but vgetty conflicts with HylaFAX, and all I need are the audio conversion binaries.)

It’s several steps to convert, but this script does it handily:

#!/bin/bash
PID=$$
if [ "$1" = "--help" ] || [ "$1" = "" ] || [ "$2" = "" ]; then
echo 1>&2 Usage: $0 [from.mp3] [to.rmd]
echo --help      this message
exit 1
fi
echo "mp3->wav"
sox -V --norm $1 -r 8k -c 1 /tmp/$PID.wav
echo "wav->pvf"
wavtopvf /tmp/$PID.wav /tmp/$PID.pvf
echo "pvf->rmd"
pvftormd US_Robotics 4 /tmp/$PID.pvf $2
rm /tmp/$PID.wav
rm /tmp/$PID.pvf

So, all that’s left to do is to set up the first script in an “at” or “cron” job.  However, it turns out that minicom requires an interactive terminal to run, so simply running the first script from an “at” job resulted in this error:

No cursor motion capability (cm)

Since the script will run minicom without being attended, a simple way around this is to use the “screen” program to provide an interactive terminal for minicom to use within cron/at:

screen -d -m announce.sh 111 announcefile.rmd
Share

LED Isolators for HDD LEDs

LED Isolator

LED Isolator

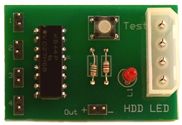
A while ago, I posted a design for a home-made circuit designed to connect multiple hard drive add-on cards (and the motherboard) to a single case LED.  I made a handful of these for the servers around here, and in the three years or so since then, I’ve yet to see anything similar.  It’s possible that nobody but me actually cares if their case light reflects drive activity across all their drives — then again, it’s also possible that the people who actually cared simply made their own.

On the off chance that anybody wants one, I went to the trouble of making some professional-looking boards.  More detail is available here.

Share

BackupPC and Bare Metal Restore of Windows XP

While it’s not well documented, it’s possible to do a bare-metal restore of a machine running Windows XP that’s been backed up via BackupPC (assuming, of course, that some method, such as that documented here, has been used to back up open files, such as the registry.)

Step 1:  Build a local tar file using BackupPC_tarCreate

The alternative, BackupPC_zipCreate, proved problematic; the gigantic archives that it created could not be completely recovered, yet tar archives proved intact.  At any rate, this is best accomplished from the command line, as the backuppc user:

BackupPC_tarCreate -t -n -1 -h borkstation -s C / > borkstation.tar

“borkstation” is the name of the host to recover, “-n -1” means the latest backup, and you’ll obviously need to have enough space where the tar file is going to store the entire backup, which will not be compressed.  Note the space between the “C”, which represents the share to restore, and the “/”, which represents the directory to restore.

Step 2:  Prepare bare XP

Basically, you want to install a working copy of the operating system.  Aside from network drivers, it really doesn’t matter if anything’s installed or working, you’re going to wipe it all out anyway.  The filesystem and the partitions will stay, so configure those the way that you want your system to finally end up.

Step 3:  Prepare Recovery Console

Using the same install CD, you can install the recovery console to speed things up a little versus booting from the CD, although either option will work.  To install the recovery console, use Start->Run, then

d:\i386\winnt32.exe /cmdcons

Where D: is the letter if the CD-ROM.  Whether you choose to install it or not isn’t really important, but what is important is that you open up the permissions for Recovery Console, or some of the remaining steps won’t work.

  1. Start->Run, then type secpol.msc
  2. Go to Security settings->Local policies->Security options
  3. Scroll down to “Recovery console: Allow floppy copy and access to all drives and all folders” and make sure it is enabled.

Step 4:  Install Cygwin

You’ll need a “tar” utility you can rely on for the next step, and experimenting with a plethora of them has shown that unless you build your own, you’ll really need Cygwin.  While installing, be sure to select the gnu tar package.  (Unless your backup contains Cygwin, you can just delete the c:\cygwin directory later to get rid of it all.)

Step 5: Unpack the tar file to the local drive

A prerequisite to this step is that you get access to the tar file created in step 1 — which you’ll have to wait for if it isn’t finished being built yet.  The simplest way to get access to the file is to map a drive to the *nix box that has the tar file. I mapped mine to the Z: drive, which was a pretty arbitrary choice.

Next, create a directory to put the recovered files into, because you do not want them going into the root directory yet.  I created a directory called “recovery.”  Launch Cygwin, then:

cd /cygdrive/c/recovery
tar -xvf /cygdrive/z/borkstation.tar

This part takes a while, but when it’s complete, the entire system as backed up will be in the c:\recovery directory.  N.B.:  this goes a little faster if you leave off the “v” parameter, but then you don’t see anything in the way of progress.  It also helps to occlude or minimize the cygwin window.

Step 6:  Rename and move files

There are three hardcoded paths in XP, that are probably the only folders in root on your minimal installation:  Program Files, Documents and Settings, and WINDOWS.  Within the c:\recovery directory, rename these to something else.  I chose “Program Files.recovery” and so on.

Once these three directories are renamed, cut and paste everything from c:\recovery to c:\.  There’s no need to replace any files in c:\, and there shouldn’t be any overlaps, so if Windows asks if you want to overwrite any files, say “no.”

Step 7:  Boot to Recovery Console and rename key folders

Here’s where Step 3 becomes pretty important.  Once you boot into Recovery Console, you’ll need to allow yourself to work in the root of the drive using the “set” command:

set AllowAllPaths = TRUE

Once that’s done, you can rename the three hardcoded directory paths, moving the originals out of the way for your recovered files.  For the sake of having a fallback position, I rename rather than delete them at this point:

ren "Program Files" "Program Files.delete"
ren "Program Files.recovery" "Program Files"
ren "Documents and Settings" "Documents and Settings.delete"
ren "Documents and Settings.recovery" "Documents and Settings"
ren WINDOWS WINDOWS.delete
ren WINDOWS.recovery WINDOWS

The suffix “.delete” has no inherent meaning, it just gets the folders out of the way and signals that I don’t need them any more.  Once this is done, and you’re sure there were no unfortunate typos, you can type “exit” to reboot to a recovered system.

Step 8:  Clean up

After rebooting, pretty much everything should be as it was, although you’ll have three extra directories with a “.deleted” suffix plus the cygwin directory to get rid of.  It may be necessary to take ownership and grant yourself permission to do so, but there’s really no reason not to wipe them all out, since your original folders and files should be intact.

While the “read only” flag has been preserved for recovered files, the “hidden” and “system” attributes have not.  For most files, this doesn’t seem to matter much, but the “desktop.ini” files that dot the drives can have weird side effects, like launching an editor upon boot and showing up.  It’s easy enough to fix from the command line:

cd \
attrib +h +s /s desktop.ini

This will grind away for a while, since it will reset all the desktop.ini files on the drive.  Once complete, you’re back to where you were upon your last backup.

Share

Hyper-V Serial Ports and Windows 2008

Unlike many other virtualization solutions, it’s not particularly easy to connect a Windows 2008 Hyper-V guest to its host serial ports.  Perversely, there are settings to connect the guest COM ports to “named pipes,” but there’s no way on the host to connect COM ports to named pipes.  (It appears that this option is used primarily for debugging programs, rather than for using actual serial ports — it doesn’t appear to have been intended to be used to provide actual serial port access from the guest.)

The Hyper-V Deployment guide contains little more than this:

“Note:  No access to a physical COM port is available from a virtual machine.”

What follows is a recipe to access the physical COM ports on the host from a guest using com0com, and its related utilities.  The idea is to make a COM port on the host available via TCP/IP, and then attach to it via the guest, then make this process automatic.

First, on the guest, you’ll need an appropriate version of hub4com, and the batch file bundled with it, com2tcp-rfc2217.bat.  Naturally, I’m running 64-bit Windows 2008, and there doesn’t appear to be a version compiled for 64-bit Windows, so I had to compile my own.  This can be kind of a pain, especially if you’re using Visual Studio Express, so you’re welcome to download my 64-bit hub2com binaries here.

My device is on COM3, and I can make it available on port 7000 using the following command line:

com2tcp-rfc2217 COM3 7000

This gives me a DOS Window that shows me what’s going on — this is handy for debugging, but hardly something I want to leave on my screen all the time.  The simplest solution is to create a launcher script:

Set objShell = CreateObject ("WScript.Shell")
objShell.Run "cmd /K CD C:\Program Files (x86)\com0com & com2tcp-rfc2217 COM3 7000", 0, false

This script effectively hides the program so that it can run in the background, so all that remains is to have it launch when the system starts.  That’s best accomplished using the registry to create a new “Expandable String Value” under “HKEY_LOCAL_MACHINE\SOFTWARE\Microsoft\Windows\CurrentVersion\Run”.  It doesn’t matter what the Name of the String Value is, but the Data should be the command line necessary to launch the script:

%WinDir%\system32\wscript "C:\Program Files (x86)\com0com\com3-listen.vbs"

When done this way, the port is made available whether or not anybody is actually logged into the machine.

The guest is only slightly trickier, requiring both com0com and hub2com binaries to be installed.  Since my guest is 32-bit Windows XP, I could use the precompiled “i386” binaries directly from the c0m0com sourceforge page.

The com0com installer wants to create a null modem pair from “cnca0” to “cncb0.”  You’ll need this pair of virtual devices, and you’ll want to turn on “baud rate emulation,” and rename one end like a regular COM port.    This can be accomplished from the com0com command line setup:

install EmuBR=yes EmuBR=yes
change CNCA0 PortName=COM3

Once the virtual port pair is available, one end can be connected to the host, using the hub2com batch file com2tcp-rfc2217:

com2tcp-rfc2217 \\.\CNCB0 host-hostname 7000

As before, this opens a DOS Window where you can see what’s going on.  At this point, COM3 on the guest is communicating directly with COM3 on the host.  As before, a small launcher script is created to hide this window:

Set objShell = CreateObject ("WScript.Shell")
objShell.Run "cmd /K CD C:\Program Files\com0com & com2tcp-rfc2217 \\.\CNCB0 skypiea 7000", 0, false

And, as before, a registry string is added to the guest to launch this automatically in its own “HKEY_LOCAL_MACHINE\SOFTWARE\Microsoft\Windows\CurrentVersion\Run” key.

%WinDir%\system32\wscript "C:\Program Files\com0com\com3-client.vbs"

Simple, eh?  Well, perhaps not, but once it’s set up, the guest Hyper-V machine can communicate via COM3.  Additional ports can be added in the same way.

Share

SIIG Cyber Serial under Windows 2008, or getting old drivers to work

I’m in the process of “upgrading” a server from Windows 2003 server to Windows 2008 server, and one of the things this server does is manage a few serial devices.  Therefore, it contains an old PCI serial board, but the manufacturer has since moved on to newer hardware, and hasn’t bothered to update the drivers.

Trying to install the Windows 2003 drivers yielded the following:

a service installation section in this inf is invalid

And, naturally, refused to install.  To track down the source of this error, there is a file created in \Windows\inf called “setupapi.dev” that logs details about the driver installation process.  Reading through this file, the reason for the error is evident:

inf:       ServiceBinary=C:\Windows\system32\DRIVERS\mf.sys  (mf.inf line 39)
!!!  dvi:       Add Service: Binary 'C:\Windows\system32\DRIVERS\mf.sys' for service 'mf' is not present.
!!!  inf:  {Install Inf Section [MFINSTALL.mf.Services] exit(0xe0000217)}

Intriguingly, a quick search through C:\Windows\System32\DriverStore\FileRepository showed that the driver does exist, it just happens not to be installed.  There’s a folder called mf.inf_Identifier (where “Identifier” appears to be random junk) that contains a file called mf.sys.  Copying this file into C:\Windows\System32\Drivers allowed the device drivers to install, and they appear to work perfectly well.

Share

RCS TX10-B X10 Thermostat Protocol

A little over 10 years ago, I bought an open-box RCS TX10-B thermostat control unit to replace a TX10 unit.  “Open Box” means it came without any documentation, but it should, in theory, be a drop-in replacement for the TX10 — the “B” designator indicates that it’s capable of reporting status and temperature, unlike the TX10.

Unfortunately, “open box” means it came without any documentation whatsoever.  On the plus side, the wiring is similar to the TX10 (with the additional feature of a physical connection for a “setback switch”) but without knowing the X10 protocol it required, I was left without any means to actually get status reports from the unit.

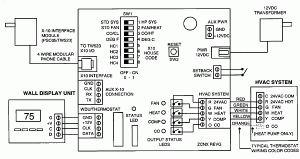
3039bdgmUsing the Internet Wayback Machine to go back to 1998, I located a nifty diagram of the system from Smart Home, from whom I originally purchased the unit.  Ten years ago, it was in the process of being replaced by the TX15-B, a more modern-looking unit — and the only one mentioned on the web site of the manufacturer.

Some experimentation demonstrated that the TX10-B substantially uses the same procotol as the TX15-B, which is documented here.  It doesn’t seem to support the “autosend” feature, nor does it respond to requests for the outdoor temperature, but otherwise, the document appears to be accurate.

The unit uses the venerable TW-523 to communicate, and I was mildly surprised to discover that my TW-523 was capable of receiving, but not sending.  Since the TX10 it was connected to wasn’t capable of sending, either, it may have been defective on the day I bought it, and I’d never have known.

(Yes, it took me 10 years to get around to this project, but now all that’s left to do is the software…)

Share

The Fujitsu Stylistic 3500 Tablet, Linux and Xubuntu

I have an old Fujistu Stylistic 3500 Tablet that I picked up cheap as hospital surplus, which usually sits in its cradle in the kitchen, handy for looking up recipes and playing music.  It came with Windows 2000 preloaded (and as surplus, ravaged by viruses) which it ran until last week, when I finally decided I have had enough of the venerable operating system, and decided to switch to something both more modern (unsurprisingly, a growing number of applications and updates refuse to run under Windows 2000 at all) and better able to make use of its aging hardware: a 500 Mhz Celeron with 256M of RAM.
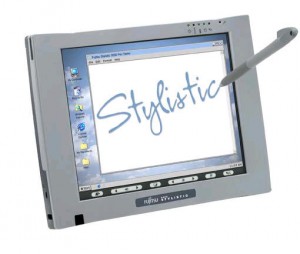
Fujitsu Stylistic 3500

Fujitsu Stylistic 3500

In addition to upgrading the operating system, I decided to replace the hard drive with an IDE-SSD drive that I found on special.  This made an intuitive kind of sense, since if anything went wrong, I could just put the old hard drive back in.  On the minus side, this meant I had to install an operating system from scratch.

Hurdle #1:  Booting

The tablet is capable of booting from a grand total of two things:  the internal hard drive, and an external floppy drive on a proprietary port.  That’s it.  I do happen to have the Fujitsu floppy drive, so I figured all I have to do is boot a Linux installer from a floppy drive, and I’m all set.

Easier said than done, I guess.  The tablet has one USB port, and the tablet itself needs software to drive the pen interface, so a USB hub and keyboard are necessary, plus a mouse for virtually any operating system’s installer these days.  After some trial-and-error, I burned Xubuntu’s installer to a physical CD, and attached a CD-ROM drive to a USB->IDE interface on the same hub.

It looked like a DOS boot disk was the way to go, since the tablet couldn’t directly boot from the CD-ROM drive, and Xubuntu doesn’t seem to have a ready-made boot floppy.  Naturally, this would require keyboard, mouse, and CD-ROM to first be available to DOS.

However, certain USB drivers would disable the mouse and keyboard when they loaded — which put a damper on being able to actually do anything once they located the CD-ROM drive.  I finally located a combination of drivers that allowed my mouse and keyboard to keep working while mounting the CD-ROM drive (rather oddly, as C:, since there were no recognizable partitions on the IDE-SSD drive, it didn’t show up at all.  No problem, though, the Linux kernel will sort it out.)

Once DOS booted and I could see the CD-ROM, I used lnload97.com to actually boot the kernel from the CD-ROM.

For those wishing to follow a similar path, I present the Fujitsu Stylistic 3500 boot diskette:  [Stylistic-3500.zip]

This is based on a USB driver diskette I located and updated; if your CD-ROM doesn’t show up as C:, or you’re installing a Linux distribution other than Xubuntu 9.10, you’ll need to edit “bootl.bat” before you run it — it should be pretty straightforward.

And the first hurdle is cleared as the Xubuntu installer is able to install Xubuntu on the tablet’s new SSD hard drive.  However, I’m not out of the woods yet.

Hurdle #2:  Networking

I decided to get the network working first, because experience has shown that everything is simpler when a computer can connect to the network.  I have a PCMCIA card for connecting to the wireless network, a Netgear WN511B, that frankly was a little flaky under Windows.  Xubuntu recognizes it, sort of, but can’t communicate to it.

First, I tried ndiswrapper to load the Windows drivers, which worked in the sense that it looked like I had a wireless card, but wpa_supplicant proved unable to connect to my WPA2-encypted network.  I also tried bcm43xx-fwcutter, which failed even more dismally.

The output of my lspci led me to seek a new path:

01:00.0 Network controller: Broadcom Corporation BCM43XG (rev 01)

As it turns out, Broadcom released a proprietary driver for BCM43?? chipsets, and although the BCM43XG isn’t specifically listed on the driver’s page, it works beautifully, at full n- speeds.

The driver’s page is here:  [802.11 Linux STA driver]

Aside from everything in the README.txt listed on that page, I added “lib80211” and “wl” to /etc/modules in order to have the driver loaded on boot.  Upon booting, the card was recognized, the wireless lan came up, and … it asked for my keyring password.

On a side note, I got the driver onto the Xubuntu tablet in the first place by loading it onto a USB flash drive; Xubuntu recognized the drive right away, and it was a simple matter of copying over the file.

Hurdle #3:  Keyring Password

With a keyboard, typing a keyring password isn’t really a big deal, as I did the first time I connected to my wireless network.  Without a keyboard, this is a considerable chore, if not outright impossible.

This is pretty easy to fix — go to ~user/.gnome2/keyrings and delete the keyring, then reboot, and next time, don’t enter a keyring password at all.  While this is less secure (the keys are stored in plaintext) it does have the advantage of not having to enter the password each time.

At this point, I installed sshd, so I could log in to it remotely, and make my life a little easier.

sudo aptitude update
sudo aptitude install openssh-server

Hurdle #4:  The Touchscreen

The touchscreen on a Stylistic 3500 shows up as a serial device, and some kind soul has already written a driver for X.

sudo aptitude install xserver-xorg-input-fpit setserial

The serial device needs to be set up, too, which can be done by creating a file called “/etc/serial.conf” and adding:

/dev/ttyS1 uart 16450 port 0xfd68 irq 5 low_latency baud_base 115200 spd_normal skip_test

The next step is to add the driver to xorg.conf … except that Xubuntu, like a lot of modern Linux distributions, doesn’t actually provide or ship with xorg.conf at all, instead relying on autodetection.  So in order to get the stylus to work, one must first create an xorg.conf.  This is most easily accomplished by killing X — Xubuntu helpfully tries to respawn X, so I took the hack-ish but expedient route of putting a junk file into /etc/X11/xorg.conf (I simply wrote the word “sampo” in it, which is not a valid configuration, which keeps X from respawning) then issued a kill command to the pid running X.  Then:

X -configure

Generated an xorg.conf that I could edit to add in the touchscreen bits.  (Parts already there are in red, my additions are in black.)

Section "ServerLayout"
 Identifier     "X.org Configured"
 Screen      0  "Screen0" 0 0
 InputDevice    "Touchscreen"
 InputDevice    "Mouse0" "CorePointer"
 InputDevice    "Keyboard0" "CoreKeyboard"
EndSection

Section "InputDevice"
 Identifier "Touchscreen"
 Driver "fpit"
 Option "Device" "/dev/ttyS1"
 Option "BaudRate" "9600"
 Option "Passive"
 Option "CorePointer"
 Option "SendCoreEvents"
 Option "MinimumXPosition" "0"
 Option "MinimumYPosition" "0"
 Option "TrackRandR"      "on"
EndSection

And I now have a working stylus.  I spent a surprising amount of time fooling around before I discovered the “TrackRandR” configuration parameter — during which my stylus worked on a postage-stamp sized corner of the tablet while the pointer shot everywhere.

Hurdle #5: remote Administration

I can administer the tablet via sshd already, but it’s handy to have remote console access, since a lot of settings are much easier to set via a GUI than by poking around the command line.  So, to provide VNC-capability for the console:

sudo aptitude install xinetd x11vnc

I considered it a good idea to set a password:

x11vnc -storepasswd

Then created a file called /etc/xinetd.d/x11vnc to launch it on demand:

service x11vnc
{
 port            = 5900
 type            = UNLISTED
 socket_type     = stream
 protocol        = tcp
 wait            = no
 user            = root
 server          = /usr/bin/x11vnc
 server_args     = -inetd -o /var/log/x11vnc.log -display :0 -auth /var/lib/gdm/:0.Xauth -many -bg -rfbauth /root/.vnc/passwd
 disable         = no
}

Hurdle #6:  gksudo and an on-screen keyboard

I used Applications->Add/Remove to add Matchbox, an on-screen keyboard, and immediately gksu popped up to request administrative rights…  which greyed out the rest of the screen, making it impossible to actually use an on-screen keyboard to enter a password.  Luckily, this is just a setting in gksudo called “Disable-grab.”  Since I could already VNC into the tablet, this actually wasn’t much of a hurdle.

Verdict

Between the IDE-SSD drive and Xubuntu, the tablet is dramatically faster than it ever was under Windows 2000.  A lot of the tablet’s use is surfing the net via Firefox, which launches and renders faster than it ever did.

Surprisingly, wireless networking is also much improved: Windows 2000 would often have trouble reconnecting to the network after rebooting, and despite being an “n” wireless card, seemed slow.  Now it’s quite stable, and runs at a full 130mbps.

Share